
How to Check Gemstone Bead Holes and Drill Quality
A loupe-first buying guide to bead-hole geometry and finish: what chips, taper, eccentricity, sharp edges, polish and residues can—and cannot—tell you.
In this field note
The smallest part of a bead often carries the most concentrated workmanship evidence. A polished sphere can look even from arm's length while its drill hole shows a sharp breakout, a thin wall, tool marks or material that has collected inside the bore.
The point is not to demand a mathematically perfect circle. Different bead shapes, drills, chamfers and two-sided drilling methods produce different geometries. A useful inspection asks whether the hole is stable, smooth where it touches the cord, proportionate to the bead and honestly described.
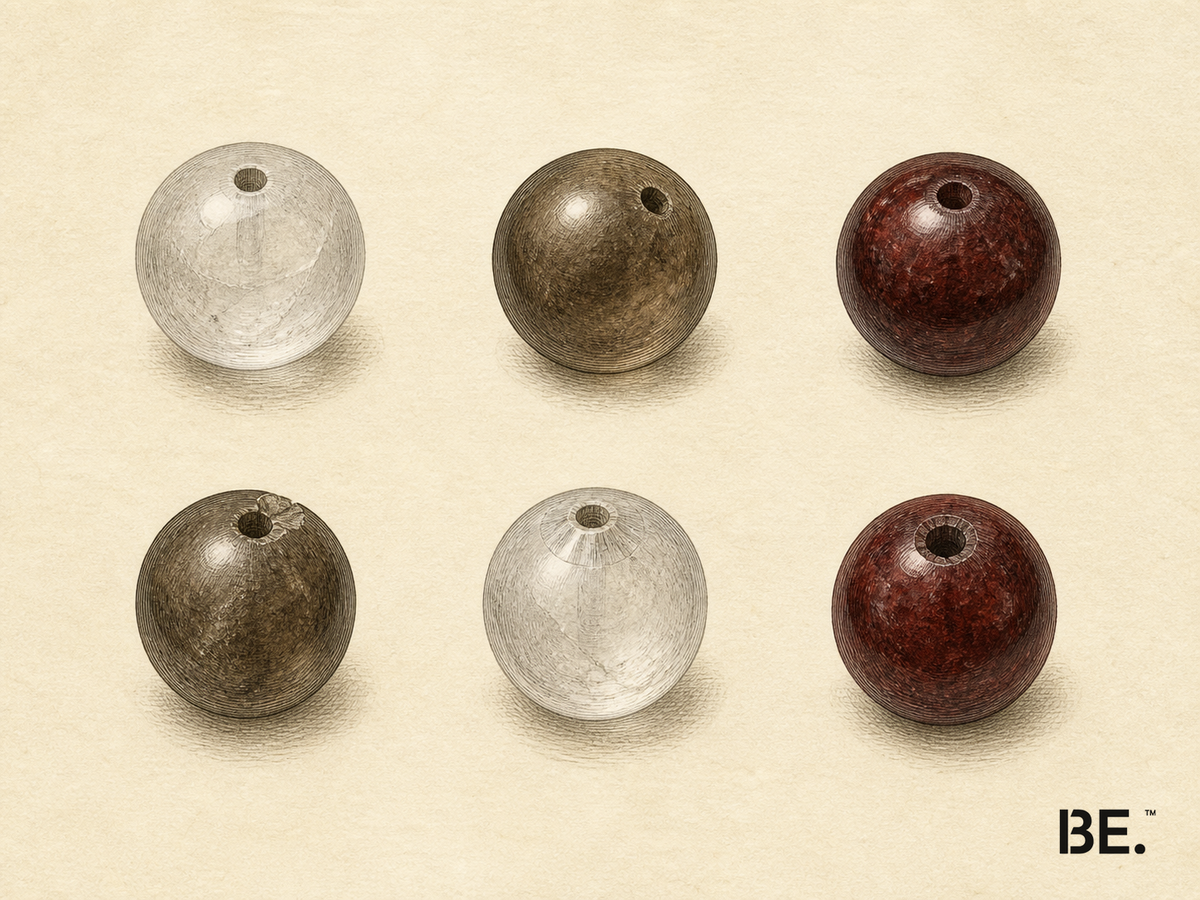
The sixty-second hole check
- Look at the whole bead first. Find the intended centre line and the thinnest wall around the hole.
- Inspect both openings. One side may be clean while the exit side is chipped or flared.
- Look through the bore. Use diffuse light, then transmitted or oblique light where the material allows it.
- Check the contact edge. The practical question is whether any sharp point meets the stringing material.
- Compare several beads. A repeated pattern across a strand says more about production finish than one isolated mark.
- Do not probe or scratch. A metal pin, blade, heat test or forced reaming can damage the bead and destroy useful evidence.
A 10× loupe is useful for separating polish reflections from actual chips. Keep the language observational: record “sharp missing crescent at one opening” before proposing why it occurred.
Read both openings and the bore
A drilled bead has at least three inspection zones: the entry opening, the exit opening and the internal bore. If it was drilled from both sides, there may also be a meeting zone. The neatest face is not automatically representative of the whole hole.
Centring matters because a severe offset can leave less material on one side and make the bead sit unevenly in a strand. Small deviations may be normal for an irregular shape or a deliberate design. Measure the effect rather than treating any offset as a defect: compare wall thickness, alignment with adjacent beads and whether the cord is forced against a sharp turn.
Chips, flare and eccentricity
| Observation | Plausible explanations | Direct concern | Not proof of |
|---|---|---|---|
| Chipped rim or missing crescent | Exit chipping during drilling, a pre-existing fracture, later impact or reaming. | A sharp edge, lost wall thickness or a visible finish inconsistency. | Fake material, low hardness or one confirmed root cause. |
| Conical or flared opening | Drill taper, intentional chamfer, exit breakout or two-sided drilling geometry. | Whether it is symmetrical, smooth and leaves enough wall. | Hand drilling, machine drilling, age or quality by shape alone. |
| Eccentric or angled hole | Positioning error, design choice or misaligned two-sided drilling. | Uneven seating, a thin side wall or a tight cord turn. | Mineral identity or treatment. |
| Sharp, ragged rim or rough bore | Incomplete smoothing, local chipping, tool marks or later wear. | Cord abrasion and an unfinished tactile edge. | Manufacturing date or exact tool type. |
| Smooth, rounded, polished rim | Careful finishing, later reaming or a material that takes a high polish. | A positive cord-contact and workmanship clue. | Natural origin, untreated status or value. |
| Colour or glue-like residue | Dye, adhesive, polishing compound, dirt or a natural deposit. | Need for cleaning history, disclosure or testing. | A named treatment from appearance alone. |
A chip is not a timestamp
Peer-reviewed studies of brittle quartz-glass machining show that drilling can produce edge chipping, particularly near the exit, and that subsurface cracks can contribute. Those studies establish plausible mechanisms, not the history of a finished gemstone bead. The same visible crescent could also reflect a pre-existing fracture, later impact or a subsequent tool pass.
A flare is not automatically a defect
A controlled chamfer can remove a sharp corner and improve the cord path. A jagged, asymmetrical breakout can do the opposite. Judge the surface finish and remaining material, not the presence of a cone by itself.
Sharp edges, polish and cord wear
Hardness and toughness are different. Mohs hardness describes scratch resistance; it does not make a material immune to chipping. The hole also concentrates geometry into a small area. That does not mean every bead will fail there, but it makes the rim and bore worth inspecting.
Run a soft cord only through an existing clear passage; do not force it. Watch where the cord changes direction at each opening. A polished, radiused edge distributes contact more gently than a sharp notch. On an assembled bracelet, also inspect whether the cord is already fuzzed, flattened or discoloured at the hole.
Residue is a clue, not a verdict
Drill holes can concentrate material that is difficult to see on the polished exterior. GIA has documented dyed aquamarine beads in which colour concentrated along drill holes and surface-reaching fractures. In another GIA case, dark residue in a pink sapphire bead's drill hole remained unidentified until further analysis. Together, the cases show why the location is useful and the instant label is not.
Photograph residue before cleaning. Ask whether the bead has been dyed, filled, stabilised, glued, restrung or polished with compound. If treatment affects value or care, request disclosure or appropriate testing. Do not turn “possible dye” into “dyed” without additional evidence.
Accept, reject or escalate
| Decision | Evidence pattern | Action |
|---|---|---|
| Accept | Openings are smooth at cord contact; wall thickness is balanced for the shape; minor variation does not affect seating. | Record the condition and use the piece normally. |
| Ask before buying | Repeated offset, visible tool marks, local roughness or unexplained residue across several beads. | Request close photographs, treatment disclosure and construction details. |
| Reject or repair professionally | Sharp chip touches the cord, one wall is extremely thin, a fracture opens at the hole or the cord already shows abrasion. | Do not rely on home polishing; have the piece assessed or choose another strand. |
| Escalate identification | Material or treatment claim changes the price, and drill-hole colour is the main evidence offered. | Use independent gemmological testing rather than a visual shortcut. |
The broader six-point jewellery quality guide covers the full-piece decision. The BE. Crystal 4T system places finish within a wider material record. If a bead is already cracked, use the crack diagnosis guide.
Frequently asked questions
Q1.Are chipped drill holes proof that a gemstone bead is fake?
No. A chip may come from drilling, a pre-existing fracture, later impact or reaming. It is a finish and durability clue, not proof of material identity.
Q2.Does an off-centre hole always mean poor quality?
No. A severe offset can leave a thin wall or make a bead sit unevenly, while small deviations may be acceptable for the shape or design. It does not identify the material.
Q3.What is a conical or flared drill-hole opening?
It may be an intentional chamfer, drill taper, exit chipping or the geometry of drilling from two sides. Judge symmetry, smoothness and remaining wall thickness rather than the shape alone.
Q4.Can a rough bead hole cut the cord?
Sharp or ragged contact points can abrade cord over time. Inspect both openings and the bore, especially where the cord changes direction.
Q5.Does colour or glue-like residue around a hole prove treatment?
No. Dye, adhesive, polishing compound, dirt and natural deposits are all possible. Record the feature, ask for disclosure and use appropriate testing when the answer matters.
Q6.Should I ream or polish a questionable hole at home?
Not before documenting it, and not on a valuable or uncertain bead without suitable tools and experience. Reaming can enlarge the hole, trigger a fracture or remove useful evidence.
References
- GIA: Coloured Stone Cut Quality: What to Look For
- GIA: Gems & Gemology, Summer 1992
- GIA: An Unusual Pink Sapphire Bead
- Proceedings of the Institution of Mechanical Engineers: Quartz-glass drilling and edge chipping
- Precision Engineering: Subsurface cracks and exit chipping
- Kenoyer: Stone bead drilling and hole forms
- GIA: More Than the Mohs Scale: Gem Durability
- GIA: Gem Identification
Field Notes.
One stone at a time: its geology, and how to read quality. The Stone Buying Checklist comes with your first email.
By subscribing you agree to receive emails from BE. Unsubscribe anytime.
Sent. Check your inbox.